소프트웨어 레인미터로 아이콘배경색 모양 변경하기
2019.07.23 22:29
레인미터로 아이콘배경색이나 모양을 쉽게 만들 수 있습니다.
예제로 첨부한 스킨은 위와 같습니다. 모양은 원 육각형등 다양하게 변경할 수 있습니다.
아래는 스킨의 내용입니다.
[FrostedGlass]
Measure=Plugin
Plugin=FrostedGlass
Type=none
Border=All
;Type Blur, Acrylic, and None
;Valid values are All, None, Left, Right, Top and Bottom.
;In order to mix and match the borders can you select a few of the sides by piping them together. e.g Border=Left | Right will create a border on only the left and right side of the skin and not on the top and bottom.
위에 부분은 도형의 채우기색을 투명값을 주었을때 흐림효과를 주는것입니다.
Type=none값만 보시면 됩니다.
Blur(조금 흐림), Acrylic(흐림), and None(흐림 효과 없음)
[MeterBg]
Meter=Shape
DynamicVariables=1
X=(14*#Scale#)
Y=(0*#Scale#)
Shape=Rectangle (3*#Scale#),(3*#Scale#),(50*#Scale#),(50*#Scale#), | Fill Color #color2# | StrokeWidth 0 | Stroke Color #color1#
가장 위의 바탕스킨입니다.
Fill Color = 채우기색입니다.
[MeterBg2]
Meter=Shape
DynamicVariables=1
X=(0*#Scale#)r
Y=(70*#Scale#)r
Shape=Rectangle (3*#Scale#),(3*#Scale#),(50*#Scale#),(50*#Scale#),(4*#Scale#) | Fill Color #color2# | StrokeWidth 0 | Stroke Color #color1#
2번째입니다.
X,Y 괄호뒤에r은 위에 바탕스킨에서 해당값만큼 이동하라는것입니다.
Shape=Rectangle (3*#Scale#),(3*#Scale#),(50*#Scale#),(50*#Scale#),(4*#Scale#)
에서 (4*#Scale#)은 사각형의 각진부분을 둥글게 해주는 값입니다. 값이 클수록 더 둥글어집니다.
[MeterBg3]
Meter=Shape
DynamicVariables=1
X=(0*#Scale#)r
Y=(70*#Scale#)r
Shape=Rectangle (3*#Scale#),(3*#Scale#),(50*#Scale#),(50*#Scale#),(4*#Scale#) | Fill Color #color2#,125 | StrokeWidth 1 | Stroke Color #color1#
3번째 스킨입니다.
StrokeWidth는 외곽선 두께입니다. 0이면 외곽선이 없는것입니다. 값이 클수록 두꺼워집니다.
Stroke Color는 외곽선 색입니다.
Fill Color #color2#,125에서 125는 투명도입니다. 1이면 완전투명입니다. 1~255사이에서 값을 주시면 됩니다.
[MeterBg4]
Meter=Shape
DynamicVariables=1
X=(0*#Scale#)r
Y=(70*#Scale#)r
Shape=Rectangle (3*#Scale#),(3*#Scale#),(50*#Scale#),(50*#Scale#),(4*#Scale#) | Fill Color #color2#,125 | StrokeWidth 3 | Stroke Color #color1#
4번째 스킨입니다.
첨부된 스킨은 더블클릭하면 색을 조절할수 있는 세팅스킨도 포함시켜놓았습니다.
내용에서 보시면 아시겠지만 color1이 외곽선 색이고 color2가 채우기 색입니다.
예제 스킨은 첨부파일에 넣어두었습니다.
위에 내용에서 (14*#Scale#)이런식으로 한 이유는 마우스 휠로 편하게 크기를 조절하기위해 추가한 내용입니다.
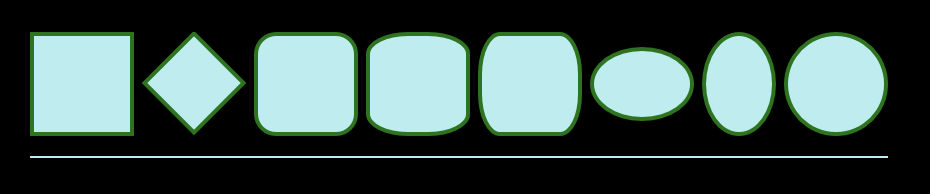
아래에서 원하는 도형의 값을 확인 하실수 있습니다.
[Rainmeter]
Update=1000
DynamicWindowSize=1
AccurateText=1

[MeterRectangle]
Meter=Shape
X=2
Y=2
Shape=Rectangle 0,0,100,100 | Extend MyModifiers1
MyModifiers1=Fill Color 191,237,239,255 | StrokeWidth 4 | Stroke Color 46,115,31,255

[MeterRotatedRectangle]
Meter=Shape
X=25R
Y=14r
Shape=Rectangle 0,0,70,70 | Extend MyModifiers1, MyModifiers2
MyModifiers1=Fill Color 191,237,239,255 | StrokeWidth 4 | Stroke Color 46,115,31,255
MyModifiers2=Rotate 45

[MeterRoundedRectangle]
Meter=Shape
X=10R
Y=2
Shape=Rectangle 0,0,100,100,20 | Extend MyModifiers1
MyModifiers1=Fill Color 191,237,239,255 | StrokeWidth 4 | Stroke Color 46,115,31,255

[MeterRoundedX]
Meter=Shape
X=10R
Y=2
Shape=Rectangle 0,0,100,100,40,20 | Extend MyModifiers1
MyModifiers1=Fill Color 191,237,239,255 | StrokeWidth 4 | Stroke Color 46,115,31,255

[MeterRoundedY]
Meter=Shape
X=10R
Y=2
Shape=Rectangle 0,0,100,100,20,40 | Extend MyModifiers1
MyModifiers1=Fill Color 191,237,239,255 | StrokeWidth 4 | Stroke Color 46,115,31,255

[MeterOvalWide]
Meter=Shape
X=10R
Y=15r
Shape=Rectangle 0,0,100,70,50 | Extend MyModifiers1
MyModifiers1=Fill Color 191,237,239,255 | StrokeWidth 4 | Stroke Color 46,115,31,255

[MeterOvalTall]
Meter=Shape
X=10R
Y=2
Shape=Rectangle 0,0,70,100,50 | Extend MyModifiers1
MyModifiers1=Fill Color 191,237,239,255 | StrokeWidth 4 | Stroke Color 46,115,31,255

[MeterEllipse]
Meter=Shape
X=10R
Y=2
Shape=Rectangle 0,0,100,100,50 | Extend MyModifiers1
MyModifiers1=Fill Color 191,237,239,255 | StrokeWidth 4 | Stroke Color 46,115,31,255

[MeterLine]
Meter=Shape
X=0
Y=20R
Shape=Rectangle 0,0,858,2, | Extend MyModifiers1
MyModifiers1=Fill Color 191,237,239,255 | StrokeWidth 0
https://docs.rainmeter.net/manual/meters/shape/
에서 가져왔습니다.
댓글 [6]
-
꼬져 2019.07.23 22:32 -
보미와미나 2019.07.24 08:49
보면서도 이해 못하는 1인.
갑파니님! 수고 하셨습니다.
-
왕초보 2019.07.24 22:42
레인미터가 못하는것이 없네요...
도형 자체를 그리다니..png파일이 필요가 없을것 같니다..
좋은 강좌를 해주셔서 감사합니다..
-
익덕이 2019.07.25 07:43
레인미터 2일차..
아직도 이해를 못하는 1인 추가...
-
갑파니 2019.07.25 22:17
2일차시면 기본적인것부터 공부하시는게 좋습니다.
레인미터로 검색하시면 좀 오래되었지만 도움되실겁니다.
언어 이런쪽 하셨으면 더 빨리 이해하실거구요..
-
notaking 2019.08.11 21:39
강좌 감사합니다... 레인미터라는걸 알게되어서 이것저것 스킨받아서 설치만 조금 해보고있습니다. ^^;
| 번호 | 제목 | 글쓴이 | 조회 | 추천 | 등록일 |
|---|---|---|---|---|---|
| [공지] | 강좌 작성간 참고해주세요 | gooddew | - | - | - |
| 4282 | 윈 도 우| 새로운시작 딜레이에관한거!! 윈7도포함 [11] | SE7EN | 21493 | 0 | 06-21 |
| 4281 | 소프트웨어| [수정등록]삼성 리커버리 솔루션 이식하기 (ATIV PRO) [11] | 달리아 | 21301 | 12 | 12-24 |
| 4280 | 윈 도 우| cmd.exe 항상 관리자 권한으로 실행하기 [14] | poison | 21265 | 5 | 10-23 |
| 4279 | 윈 도 우| 윈도우7 USER-PE로 XP 를 설치하는 방법 [3] | 세리아 | 21256 | 3 | 07-23 |
| 4278 | 우측 하단 테스트모드 [3] |
|
21237 | 0 | 08-01 |
| 4277 | 윈 도 우| 바탕화면에 익스플로러아이콘 생성 + 복구 [14] |
|
21232 | 0 | 04-24 |
| 4276 | windows 7 정상 종료 안될때 [3] |
|
21195 | 0 | 07-13 |
| 4275 | 윈 도 우| 윈도우XP 계정의 권한을 최고 권한(SYSTEM)으로 상승시키기 [14] |
|
21159 | 1 | 01-19 |
| 4274 | 소프트웨어| 중국어TXT 중국어깨짐 현상,,, (중국판 윈도우에서 작업한 ... [6] | 화이팅맨 | 21133 | 1 | 11-19 |
| 4273 | 윈 도 우| Total Uninstall 등록팁 [5] | 고독남 | 21067 | 3 | 01-29 |
| 4272 | 윈 도 우| 윈도우7, 2008R2, XP, MAN7PE 몽땅 통합하기! [7] | Fentanest | 20978 | 0 | 07-31 |
| 4271 | 윈 도 우| 윈도우7 USER-PE로 윈도우8 을 설치하는 방법 [12] | 세리아 | 20913 | 6 | 08-17 |
| 4270 | 하드웨어| 트위터를 통해서 잠자는 시간을 알수 있다??? SleepingTime... [3] |
|
20907 | 0 | 03-26 |
| 4269 | 윈 도 우| 예약파티션 100MB 제거하기 [3] | 우금티 | 20876 | 0 | 01-31 |
| 4268 | 하드웨어| foobar 2000 v1.0.1 설치와 Yin Yang v0.9.2 by Br3tt 스킨... [6] | ♥ZARD | 20799 | 0 | 03-19 |
| 4267 | 윈 도 우| Windows 7 Professional 이하 에디션에 언어팩 설치하기 [6] | PiPS | 20627 | 0 | 03-01 |
| 4266 | 윈 도 우| UEFI 설치의 모든것 [13] | LazyFlow | 20621 | 4 | 11-09 |
| 4265 | 비스타및윈도7 복사속도높이기 [19] |
|
20610 | 1 | 08-31 |
| 4264 | 윈 도 우| usb 이용한 윈도우7 설치 ((스누피님 블로그 링크)) [7] | 노을 | 20603 | 0 | 02-19 |
| 4263 | 윈 도 우| (펌)윈도우8을 편리하게 쓰는 3가지 팁 [11] | 푸른강산 | 20559 | 2 | 11-27 |
강좌 감사합니다 - 꾸 벅 -